Showing posts with label daring bakers. Show all posts
Wednesday, July 30, 2008
Daring Bakers
So it's time I do this for good--I need to resign from the group. I haven't been the best of posters, constantly too busy, too many emergencies, not enough money, and this month is a testament to that. I literally don't have the money to make the cake this month--I spent my last $4 on a big bunch of beans a giant zucchini at the Farmer's Market--I'm working a 50 hour week while still in class (which is creative writing, so there's a lot outside of class to do in addition to the 7 hours every week I have to be outside of my apartment). Anyway, all excuses aside, I need to quit.
It's been a lovely year (this would have been my 1st Daring Bakeversery) and I've truly enjoyed the challenges. The sticky buns were out of this world! The crepe cake was fucking fantastic! The cheesecake pops were uber yum! But sometimes I just need to let something go.
Don't forget to check out the blogroll to read all about this month's challenge. The Filbert Gateaus with Praline Buttercream look amazing. Everyone rose to the recipe. And I'm going back to working and writing and cooking (and playing with my cats!). Have a beautiful Wednesday and I'll be back Friday with a real recipe!
Sunday, June 29, 2008
Daring Bakers Danish Braid Bread
So.... it's been one month since I posted... I needed (kneaded?) the month off. My uber intense French translation class just ended (god knows how the final grade will turn out--but it's over, that's what counts!), I'm finally 100% healthy, and I'm back in the cooking/baking realm again.
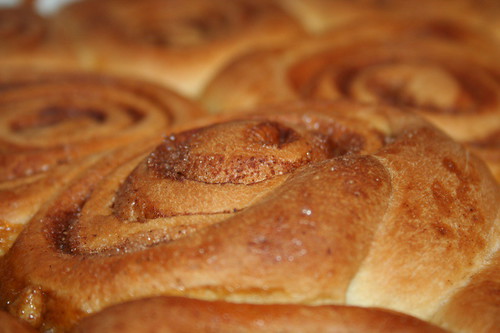
This month's Daring Bakers Challenge was picked by Kelly of Sass & Veracity and Ben of What's Cookin'? and they picked a decently easy Danish Braid recipe. The only catch is that it takes either one entire day or two days to complete. But the hands-on time was not long at all and the whole recipe was wonderfully simple. And easy to veganize. (smile) It's always a plus when the DB challenge doesn't call for one dozen eggs.
For the dough, I substituted vegan yogurt for the eggs, Earth Balance for the butter, and soymilk for the whole milk. I think my kneading/rolling technique was a bit too intense because the bread isn't as flaky as I'd like, but it's still damn delicious. Kyle, the friend who turned me vegan (in the nicest way possible) is back from Thailand and living on my couch, and he gave the bread 2 thumbs up.
The butter block and the apple filling just needed an Earth Balance for butter substitute.
All in all, a fun, easy challenge and a great way to get back into the kitchen and the blog world. I promise to not disappear again for a month!
Danish Dough
Makes 2-1/2 pounds dough
For the dough (Detrempe)
1 ounce fresh yeast or 1 tablespoon active dry yeast
1/2 cup soy milk
1/3 cup sugar
3/4 teaspoon ground cardamom
1-1/2 teaspoons vanilla extract
1/2 cup vanilla soy yogurt
1/4 cup fresh orange juice
3-1/4 cups all-purpose flour
1 teaspoon salt
For the butter block (Beurrage)
1/2 pound (2 sticks) Earth Balance
1/4 cup all-purpose flour
Dough
Combine yeast and milk in a bowl with a hand mixer on low speed or a whisk. Add sugar, cardamom, vanilla extract, yogurt, and orange juice and mix well.
Sift flour and salt on your working surface and make a fountain. Make sure that the “walls” of your fountain are thick and even. Pour the liquid in the middle of the fountain. With your fingertips, mix the liquid and the flour starting from the middle of the fountain, slowly working towards the edges.
When the ingredients have been incorporated start kneading the dough with the heel of your hands until it becomes smooth and easy to work with, around 5 to 7 minutes. You might need to add more flour if the dough is sticky.
Butter Block
Combine Earth Balance and flour in the bowl of a mixer fitted with a paddle attachment and beat on medium speed for 1 minute. Scrape down the sides of the bowl and the paddle and then beat for 1 minute more, or until smooth and lump free. Set aside at room temperature.
After the detrempe has chilled 30 minutes, turn it out onto a lightly floured surface. Roll the dough into a rectangle approximately 18 x 13 inches and ¼ inch thick. The dough may be sticky, so keep dusting it lightly with flour. Spread the butter evenly over the center and right thirds of the dough. Fold the left edge of the detrempe to the right, covering half of the butter. Fold the right third of the rectangle over the center third. The first turn has now been completed. Mark the dough by poking it with your finger to keep track of your turns, or use a sticky and keep a tally. Place the dough on a baking sheet, wrap it in plastic wrap, and refrigerate for 30 minutes.
Place the dough lengthwise on a floured work surface. The open ends should be to your right and left. Roll the dough into another approximately 13 x 18 inch, ¼-inch-thick rectangle. Again, fold the left third of the rectangle over the center third and the right third over the center third. No additional butter will be added as it is already in the dough. The second turn has now been completed. Refrigerate the dough for 30 minutes.
Roll out, turn, and refrigerate the dough two more times, for a total of four single turns. Make sure you are keeping track of your turns. Refrigerate the dough after the final turn for at least 5 hours or overnight. The Danish dough is now ready to be used. If you will not be using the dough within 24 hours, freeze it. To do this, roll the dough out to about 1 inch in thickness, wrap tightly in plastic wrap, and freeze. Defrost the dough slowly in the refrigerator for easiest handling. Danish dough will keep in the freezer for up to 1 month.
Apple Filling
4 Granny Smith apples, peeled, cored, and cut into ¼-inch pieces
1/2 cup sugar
1 tsp. ground cinnamon
1 tsp. vanilla extract
1/4 cup fresh lemon juice
4 tablespoons Earth Balance
Toss all ingredients except butter in a large bowl.
Melt the Earth Balance in a sauté pan over medium heat until slightly nutty in color, about 6 - 8 minutes.
Then add the apple mixture and sauté until apples are softened and caramelized, 10 to 15 minutes.
Pour the cooked apples onto a baking sheet to cool completely before forming the braid. (If making ahead, cool to room temperature, seal, and refrigerate.) They will cool faster when spread in a thin layer over the surface of the sheet.
After they have cooled, the filling can be stored in the refrigerator for up to 3 days. Left over filling can be used as an ice cream topping, for muffins, cheesecake, or other pastries.
Danish Braid
1/2 recipe Danish Dough
2 cups apple filling
Line a baking sheet with a silicone mat or parchment paper. On a lightly floured surface, roll the Danish Dough into a 15 x 20-inch rectangle, ¼ inch thick. If the dough seems elastic and shrinks back when rolled, let it rest for a few minutes, then roll again. Place the dough on the baking sheet.
Along one long side of the pastry make parallel, 5-inch-long cuts with a knife or rolling pastry wheel, each about 1 inch apart. Repeat on the opposite side, making sure to line up the cuts with those you’ve already made.
Spoon the filling to fill your braid down the center of the rectangle. Starting with the top and bottom “flaps”, fold the top flap down over the filling to cover. Next, fold the bottom “flap” up to cover filling. This helps keep the braid neat and helps to hold in the filling. Now begin folding the cut side strips of dough over the filling, alternating first left, then right, left, right, until finished. Trim any excess dough and tuck in the ends.
Proofing and Baking
Spray cooking oil onto a piece of plastic wrap, and place over the braid. Proof at room temperature or, if possible, in a controlled 90 degree F environment for about 2 hours, or until doubled in volume and light to the touch.
Near the end of proofing, preheat oven to 400 degrees F. Position a rack in the center of the oven.
Bake for 10 minutes, then rotate the pan so that the side of the braid previously in the back of the oven is now in the front. Lower the oven temperature to 350 degrees F, and bake about 15-20 minutes more, or until golden brown. Cool and serve the braid either still warm from the oven or at room temperature. The cooled braid can be wrapped airtight and stored in the refrigerator for up to 2 days, or freeze for 1 month.
This month's Daring Bakers Challenge was picked by Kelly of Sass & Veracity and Ben of What's Cookin'? and they picked a decently easy Danish Braid recipe. The only catch is that it takes either one entire day or two days to complete. But the hands-on time was not long at all and the whole recipe was wonderfully simple. And easy to veganize. (smile) It's always a plus when the DB challenge doesn't call for one dozen eggs.
For the dough, I substituted vegan yogurt for the eggs, Earth Balance for the butter, and soymilk for the whole milk. I think my kneading/rolling technique was a bit too intense because the bread isn't as flaky as I'd like, but it's still damn delicious. Kyle, the friend who turned me vegan (in the nicest way possible) is back from Thailand and living on my couch, and he gave the bread 2 thumbs up.The butter block and the apple filling just needed an Earth Balance for butter substitute.
All in all, a fun, easy challenge and a great way to get back into the kitchen and the blog world. I promise to not disappear again for a month!
Danish Dough
Makes 2-1/2 pounds dough
For the dough (Detrempe)
1 ounce fresh yeast or 1 tablespoon active dry yeast
1/2 cup soy milk
1/3 cup sugar
3/4 teaspoon ground cardamom
1-1/2 teaspoons vanilla extract
1/2 cup vanilla soy yogurt
1/4 cup fresh orange juice
3-1/4 cups all-purpose flour
1 teaspoon salt
For the butter block (Beurrage)
1/2 pound (2 sticks) Earth Balance
1/4 cup all-purpose flour
Dough
Combine yeast and milk in a bowl with a hand mixer on low speed or a whisk. Add sugar, cardamom, vanilla extract, yogurt, and orange juice and mix well.
Sift flour and salt on your working surface and make a fountain. Make sure that the “walls” of your fountain are thick and even. Pour the liquid in the middle of the fountain. With your fingertips, mix the liquid and the flour starting from the middle of the fountain, slowly working towards the edges.
When the ingredients have been incorporated start kneading the dough with the heel of your hands until it becomes smooth and easy to work with, around 5 to 7 minutes. You might need to add more flour if the dough is sticky.
Butter Block
Combine Earth Balance and flour in the bowl of a mixer fitted with a paddle attachment and beat on medium speed for 1 minute. Scrape down the sides of the bowl and the paddle and then beat for 1 minute more, or until smooth and lump free. Set aside at room temperature.
After the detrempe has chilled 30 minutes, turn it out onto a lightly floured surface. Roll the dough into a rectangle approximately 18 x 13 inches and ¼ inch thick. The dough may be sticky, so keep dusting it lightly with flour. Spread the butter evenly over the center and right thirds of the dough. Fold the left edge of the detrempe to the right, covering half of the butter. Fold the right third of the rectangle over the center third. The first turn has now been completed. Mark the dough by poking it with your finger to keep track of your turns, or use a sticky and keep a tally. Place the dough on a baking sheet, wrap it in plastic wrap, and refrigerate for 30 minutes.
Place the dough lengthwise on a floured work surface. The open ends should be to your right and left. Roll the dough into another approximately 13 x 18 inch, ¼-inch-thick rectangle. Again, fold the left third of the rectangle over the center third and the right third over the center third. No additional butter will be added as it is already in the dough. The second turn has now been completed. Refrigerate the dough for 30 minutes.
Roll out, turn, and refrigerate the dough two more times, for a total of four single turns. Make sure you are keeping track of your turns. Refrigerate the dough after the final turn for at least 5 hours or overnight. The Danish dough is now ready to be used. If you will not be using the dough within 24 hours, freeze it. To do this, roll the dough out to about 1 inch in thickness, wrap tightly in plastic wrap, and freeze. Defrost the dough slowly in the refrigerator for easiest handling. Danish dough will keep in the freezer for up to 1 month.
Apple Filling
4 Granny Smith apples, peeled, cored, and cut into ¼-inch pieces
1/2 cup sugar
1 tsp. ground cinnamon
1 tsp. vanilla extract
1/4 cup fresh lemon juice
4 tablespoons Earth Balance
Toss all ingredients except butter in a large bowl.
Melt the Earth Balance in a sauté pan over medium heat until slightly nutty in color, about 6 - 8 minutes.
Then add the apple mixture and sauté until apples are softened and caramelized, 10 to 15 minutes.
Pour the cooked apples onto a baking sheet to cool completely before forming the braid. (If making ahead, cool to room temperature, seal, and refrigerate.) They will cool faster when spread in a thin layer over the surface of the sheet.
After they have cooled, the filling can be stored in the refrigerator for up to 3 days. Left over filling can be used as an ice cream topping, for muffins, cheesecake, or other pastries.
Danish Braid
1/2 recipe Danish Dough
2 cups apple filling
Line a baking sheet with a silicone mat or parchment paper. On a lightly floured surface, roll the Danish Dough into a 15 x 20-inch rectangle, ¼ inch thick. If the dough seems elastic and shrinks back when rolled, let it rest for a few minutes, then roll again. Place the dough on the baking sheet.
Along one long side of the pastry make parallel, 5-inch-long cuts with a knife or rolling pastry wheel, each about 1 inch apart. Repeat on the opposite side, making sure to line up the cuts with those you’ve already made.
Spoon the filling to fill your braid down the center of the rectangle. Starting with the top and bottom “flaps”, fold the top flap down over the filling to cover. Next, fold the bottom “flap” up to cover filling. This helps keep the braid neat and helps to hold in the filling. Now begin folding the cut side strips of dough over the filling, alternating first left, then right, left, right, until finished. Trim any excess dough and tuck in the ends.
Proofing and Baking
Spray cooking oil onto a piece of plastic wrap, and place over the braid. Proof at room temperature or, if possible, in a controlled 90 degree F environment for about 2 hours, or until doubled in volume and light to the touch.
Near the end of proofing, preheat oven to 400 degrees F. Position a rack in the center of the oven.
Bake for 10 minutes, then rotate the pan so that the side of the braid previously in the back of the oven is now in the front. Lower the oven temperature to 350 degrees F, and bake about 15-20 minutes more, or until golden brown. Cool and serve the braid either still warm from the oven or at room temperature. The cooled braid can be wrapped airtight and stored in the refrigerator for up to 2 days, or freeze for 1 month.
Sunday, April 27, 2008
Daring Bakers Cheesecake Bites
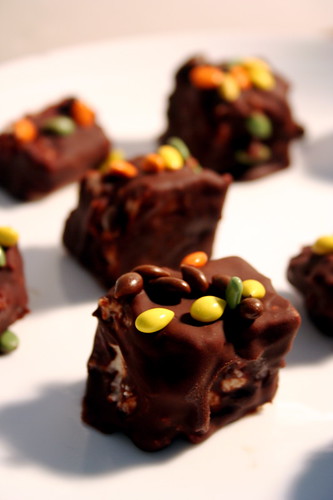
It's been awhile since I managed to successfully complete a Daring Bakers challenge. I tried the yule log back in December, but my gluten-free, vegan version fell apart and I just didn't have the heart to post my mess. But I'm back!
This month's challenge was posed by Elle of Feeding my Enthusiasms and Deborah of Taste and Tell. They found a cute concept recipe based on turning cheesecake into bite-sized pops on a stick (or something like that).

I originally planned on making the recipe as written (all dairy/egg ingredients included), but decided at the last minute to veganize it, because, really, I wanted to eat it too. This might have been a mistake though...I ate waaay more of the cute, little, enticing cheesecake bites than I should have.
Unfortunately I had a few time constraints (I started making the pops on Sunday afternoon for a Sunday night potluck) and couldn't find any lollipop stick things, but the end product (post-multiple-freezes) was delicious, apparently non-vegan tasting, and quickly eaten by my potlucking friends.
As always, go check out the now-plethora of Daring Bakers to see what everyone came up with!
For the cheesecake:
2 14 oz package firm silken tofu (NoriMu)
2 8 oz package Tofutti cream cheese
1 1/3 cup sugar
1/2 cup soy milk
3 tsp vanilla extract
1 tsp almond extract
4 tbsp cornstarch
Preheat oven to 350F.
Place silken tofu and vegan cream cheese in the food processor. Process for 1 minute, then add sugar. Process until smooth and no sugar granules remain, 3-5 minutes.
In a small bowl, whisk the cornstarch into the soy milk and vanilla and almond extracts. Pour mixture into the food processor and process until very smooth. Pour into a foil lined 9" springform pan and bake for an hour and a half.
Allow to cool at room temperature for 2 hours, then refrigerate overnight.
When the cheesecake is cold and very firm, scoop the cheesecake into 2-ounce balls and place on a parchment paper-lined baking sheet. Carefully insert a lollipop stick into each cheesecake ball. Freeze the cheesecake pops, uncovered, until very hard, at least 1 – 2 hours. (I sliced the cheesecake into squares instead of scooping balls.)
For the chocolate coat:
8 oz vegan chocolate (I use Baker's semi-sweet baking squares)
2-4 Tbsp Earth Balance
When the cheesecake pops are frozen and ready for dipping, prepare the chocolate. In the top of a double boiler, set over simmering water, or in a heatproof bowl set over a pot of simmering water, heat half the chocolate and half the Earth Balance, stirring often, until chocolate is melted and chocolate and butter are combined. Stir until completely smooth. (Add more Earth Balance if needed to get a more viscous consistency. I ended up adding a few tablespoons of soymilk because my bites weren't frozen and collapsed in the heat of the chocolate.) Do not heat the chocolate too much or your chocolate will lose it’s shine after it has dried. Save the rest of the chocolate and shortening for later dipping, or use another type of chocolate for variety.
Assembly:
Quickly dip a frozen cheesecake pop in the melted chocolate, swirling quickly to coat it completely. Shake off any excess into the melted chocolate. If you like, you can now roll the pops quickly in optional decorations. You can also drizzle them with a contrasting color of melted chocolate (dark chocolate drizzled over milk chocolate or white chocolate over dark chocolate, etc.) Place the pop on a clean parchment paper-lined baking sheet to set. Repeat with remaining pops, melting more chocolate and shortening (or confectionary chocolate pieces) as needed.
Refrigerate the pops for up to 24 hours, until ready to serve.
This month's challenge was posed by Elle of Feeding my Enthusiasms and Deborah of Taste and Tell. They found a cute concept recipe based on turning cheesecake into bite-sized pops on a stick (or something like that).

I originally planned on making the recipe as written (all dairy/egg ingredients included), but decided at the last minute to veganize it, because, really, I wanted to eat it too. This might have been a mistake though...I ate waaay more of the cute, little, enticing cheesecake bites than I should have.
Unfortunately I had a few time constraints (I started making the pops on Sunday afternoon for a Sunday night potluck) and couldn't find any lollipop stick things, but the end product (post-multiple-freezes) was delicious, apparently non-vegan tasting, and quickly eaten by my potlucking friends.
As always, go check out the now-plethora of Daring Bakers to see what everyone came up with!
For the cheesecake:
2 14 oz package firm silken tofu (NoriMu)
2 8 oz package Tofutti cream cheese
1 1/3 cup sugar
1/2 cup soy milk
3 tsp vanilla extract
1 tsp almond extract
4 tbsp cornstarch
Preheat oven to 350F.
Place silken tofu and vegan cream cheese in the food processor. Process for 1 minute, then add sugar. Process until smooth and no sugar granules remain, 3-5 minutes.
In a small bowl, whisk the cornstarch into the soy milk and vanilla and almond extracts. Pour mixture into the food processor and process until very smooth. Pour into a foil lined 9" springform pan and bake for an hour and a half.
Allow to cool at room temperature for 2 hours, then refrigerate overnight.
When the cheesecake is cold and very firm, scoop the cheesecake into 2-ounce balls and place on a parchment paper-lined baking sheet. Carefully insert a lollipop stick into each cheesecake ball. Freeze the cheesecake pops, uncovered, until very hard, at least 1 – 2 hours. (I sliced the cheesecake into squares instead of scooping balls.)
For the chocolate coat:
8 oz vegan chocolate (I use Baker's semi-sweet baking squares)
2-4 Tbsp Earth Balance
When the cheesecake pops are frozen and ready for dipping, prepare the chocolate. In the top of a double boiler, set over simmering water, or in a heatproof bowl set over a pot of simmering water, heat half the chocolate and half the Earth Balance, stirring often, until chocolate is melted and chocolate and butter are combined. Stir until completely smooth. (Add more Earth Balance if needed to get a more viscous consistency. I ended up adding a few tablespoons of soymilk because my bites weren't frozen and collapsed in the heat of the chocolate.) Do not heat the chocolate too much or your chocolate will lose it’s shine after it has dried. Save the rest of the chocolate and shortening for later dipping, or use another type of chocolate for variety.
Assembly:
Quickly dip a frozen cheesecake pop in the melted chocolate, swirling quickly to coat it completely. Shake off any excess into the melted chocolate. If you like, you can now roll the pops quickly in optional decorations. You can also drizzle them with a contrasting color of melted chocolate (dark chocolate drizzled over milk chocolate or white chocolate over dark chocolate, etc.) Place the pop on a clean parchment paper-lined baking sheet to set. Repeat with remaining pops, melting more chocolate and shortening (or confectionary chocolate pieces) as needed.
Refrigerate the pops for up to 24 hours, until ready to serve.
Monday, November 26, 2007
Daring Bakers Potato Bread
I moved the day after Thanksgiving and I don't have internet yet, so my post is a bit on the late (but still on time!) end this month.
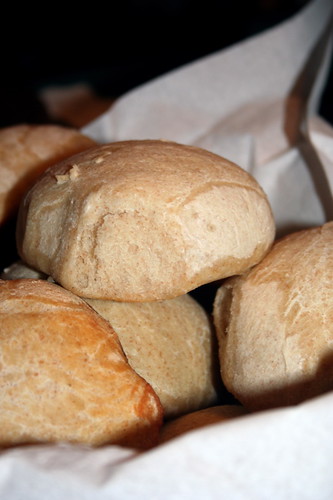
This month Tanna of My Kitchen In Half Cups chose "Tender Potato Bread" as the November Daring Bakers challenge. I love bread! And it's automatically vegan. From the get-go I was excited about the recipe. In the spirit of an already DB vegan recipe I decided to follow it to the letter of the law. So on Thanksgiving morning (mind you, I'm hosting Thanksgiving at my house this year--for the first time ever...) I woke up and started on the delicious carbohydrate goodness.
Following the recipe EXACTLY was a bad bad bad idea. DO NOT add in all of the water first. I used, I swear to god, 8-10 cups of flour and the dough was still hell to work with. Sticky, soppy, sad sad mess. Luckily my mom was at my house by the time I tried to shape the rolls and she gave me a helping hand. It was a two person job. Seriously, the dough was ridiculous.
The rolls, however, were taaaasty. Mmm mmm good. They were soft and sourdoughy and perfect for a mixed vegan-meaty Thanksgiving dinner. Because the dough was so hard to work with, the rolls didn't turn our nearly as pretty as I was hoping. They were huge and moundish...but the taste is what matters.
I would totally make this recipe again (I'm still eating off of it now!), but I would recommend adding HALF of the water and at the end, when you're kneading, probably, add more water or flour as needed. Adding all of the water and then trying to add enough flour was a mess and a pain in the ass (pardon my french, I'm young, it comes second nature to me) and got flour all over the kitchen--my clothes were thrown into the hamper as soon as I was done attempting to knead the stickyness.
Anyways, here's the recipe. Bake if you dare!
4 medium to large floury (baking) potatoes, peeled and cut into chunks variety of potatoes you might want to use would include Idaho, Russet & Yukon gold
4 cups water
1 tablespoon plus 1 teaspoon salt
2 teaspoons active dry yeast
6 ½ cups to 8 ½ cups unbleached all-purpose flour
1 tablespoon unsalted butter, softened
1 cup whole wheat flour
Put the potatoes and 4 cups water in a sauce pan and bring to boil. Add 1 teaspoon salt and cook, half covered, until the potatoes are very tender.
Drain the potatoes, SAVE THE POTATO WATER, and mash the potatoes well.
Measure out 3 cups of the reserved potato water (add extra water if needed to make 3 cups). Place the water and mashed potatoes in the bowl you plan to mix the bread in – directions will be for by hand. Let cool to lukewarm – stir well before testing the temperature – it should feel barely warm to your hand. You should be able to submerge you hand in the mix and not be uncomfortable.
Mix & stir yeast into cooled water and mashed potatoes & water and let stand 5 minutes.
This month Tanna of My Kitchen In Half Cups chose "Tender Potato Bread" as the November Daring Bakers challenge. I love bread! And it's automatically vegan. From the get-go I was excited about the recipe. In the spirit of an already DB vegan recipe I decided to follow it to the letter of the law. So on Thanksgiving morning (mind you, I'm hosting Thanksgiving at my house this year--for the first time ever...) I woke up and started on the delicious carbohydrate goodness.Following the recipe EXACTLY was a bad bad bad idea. DO NOT add in all of the water first. I used, I swear to god, 8-10 cups of flour and the dough was still hell to work with. Sticky, soppy, sad sad mess. Luckily my mom was at my house by the time I tried to shape the rolls and she gave me a helping hand. It was a two person job. Seriously, the dough was ridiculous.
The rolls, however, were taaaasty. Mmm mmm good. They were soft and sourdoughy and perfect for a mixed vegan-meaty Thanksgiving dinner. Because the dough was so hard to work with, the rolls didn't turn our nearly as pretty as I was hoping. They were huge and moundish...but the taste is what matters.
I would totally make this recipe again (I'm still eating off of it now!), but I would recommend adding HALF of the water and at the end, when you're kneading, probably, add more water or flour as needed. Adding all of the water and then trying to add enough flour was a mess and a pain in the ass (pardon my french, I'm young, it comes second nature to me) and got flour all over the kitchen--my clothes were thrown into the hamper as soon as I was done attempting to knead the stickyness.
Anyways, here's the recipe. Bake if you dare!
4 medium to large floury (baking) potatoes, peeled and cut into chunks variety of potatoes you might want to use would include Idaho, Russet & Yukon gold
4 cups water
1 tablespoon plus 1 teaspoon salt
2 teaspoons active dry yeast
6 ½ cups to 8 ½ cups unbleached all-purpose flour
1 tablespoon unsalted butter, softened
1 cup whole wheat flour
Put the potatoes and 4 cups water in a sauce pan and bring to boil. Add 1 teaspoon salt and cook, half covered, until the potatoes are very tender.
Drain the potatoes, SAVE THE POTATO WATER, and mash the potatoes well.
Measure out 3 cups of the reserved potato water (add extra water if needed to make 3 cups). Place the water and mashed potatoes in the bowl you plan to mix the bread in – directions will be for by hand. Let cool to lukewarm – stir well before testing the temperature – it should feel barely warm to your hand. You should be able to submerge you hand in the mix and not be uncomfortable.
Mix & stir yeast into cooled water and mashed potatoes & water and let stand 5 minutes.
Then mix in 2 cups of all-purpose flour and mix. Allow to rest several minutes.
Sprinkle on the remaining 1 tablespoon salt and the softened butter; mix well. Add the 1 cup whole wheat flour, stir briefly.
Add 2 cups of the unbleached all-purpose flour and stir until all the flour has been incorporated.
At this point you have used 4 cups of the possible 8 ½ cups suggested by the recipe.
Turn the dough out onto a generously floured surface and knead for about 10 minutes, incorporating flour as needed to prevent sticking. The dough will be very sticky to begin with, but as it takes up more flour from the kneading surface, it will become easier to handle; use a dough scraper to keep your surface clean. The kneaded dough will still be very soft.
Place the dough in a large clean bowl or your rising container of choice, cover with plastic wrap or lid, and let rise about 2 hours or until doubled in volume.
Turn the dough out onto a well-floured surface and knead gently several minutes. It will be moist and a little sticky.
Divide the dough into 2 unequal pieces in a proportion of one-third and two-thirds (one will be twice as large as the other). Place the smaller piece to one side and cover loosely.
Butter a 13 x 9 inch sheet cake pan or a shallow cake pan. Cut the dough into 12 equal pieces. Shape each into a ball under the palm of your floured hand and place on the baking sheet, leaving 1/2 inch between the balls. Cover with plastic wrap and let rise for about 35 minutes, until puffy and almost doubled.
Dust risen rolls with a little all-purpose flour or lightly brush the tops with a little melted butter or olive oil (the butter will give a golden/browned crust). Slash crosswise two or three times with a razor blade or very sharp knife and immediately place on the stone, tiles or baking sheet in the oven.
Bake rolls until golden, about 30 minutes.
Sprinkle on the remaining 1 tablespoon salt and the softened butter; mix well. Add the 1 cup whole wheat flour, stir briefly.
Add 2 cups of the unbleached all-purpose flour and stir until all the flour has been incorporated.
At this point you have used 4 cups of the possible 8 ½ cups suggested by the recipe.
Turn the dough out onto a generously floured surface and knead for about 10 minutes, incorporating flour as needed to prevent sticking. The dough will be very sticky to begin with, but as it takes up more flour from the kneading surface, it will become easier to handle; use a dough scraper to keep your surface clean. The kneaded dough will still be very soft.
Place the dough in a large clean bowl or your rising container of choice, cover with plastic wrap or lid, and let rise about 2 hours or until doubled in volume.
Turn the dough out onto a well-floured surface and knead gently several minutes. It will be moist and a little sticky.
Divide the dough into 2 unequal pieces in a proportion of one-third and two-thirds (one will be twice as large as the other). Place the smaller piece to one side and cover loosely.
Butter a 13 x 9 inch sheet cake pan or a shallow cake pan. Cut the dough into 12 equal pieces. Shape each into a ball under the palm of your floured hand and place on the baking sheet, leaving 1/2 inch between the balls. Cover with plastic wrap and let rise for about 35 minutes, until puffy and almost doubled.
Dust risen rolls with a little all-purpose flour or lightly brush the tops with a little melted butter or olive oil (the butter will give a golden/browned crust). Slash crosswise two or three times with a razor blade or very sharp knife and immediately place on the stone, tiles or baking sheet in the oven.
Bake rolls until golden, about 30 minutes.
Subscribe to:
Posts (Atom)